
The best time to build a 3 season outdoor room is late spring through early fall, with construction ideally starting in April or May in most regions. This timing lets you finish before summer’s peak heat and enjoy your new space right away, while contractors face fewer weather delays and your foundation work benefits from stable, dry ground.
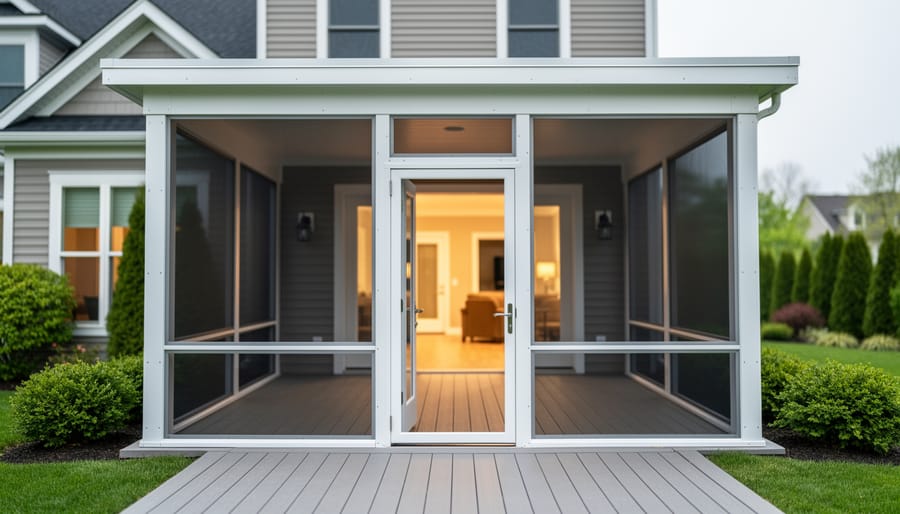
A 3 season room transforms that underused patio or deck into a comfortable retreat where you can sip morning coffee as frost settles outside or host dinner parties well into October. Unlike fully enclosed additions, these semi-conditioned spaces blur the line between indoors and out, giving you protection from bugs, rain, and chilly winds without the expense of year-round heating and cooling systems.
Your local climate plays the biggest role in shifting this timeline. If you live where spring arrives early and winters stay mild, you might break ground in March. Northern homeowners often wait until mid-May when the ground thaws completely and evening temperatures stay above freezing. The project itself usually takes six to ten weeks from permit to finished screens, so planning backward from when you want to use the room helps you pick the right start date. Construction during moderate weather also means your crew works faster, materials cure properly, and you avoid the frustration of watching rain tarps cover your half-built dream space for days on end.
Quick Answer: Best Time to Build Your 3 Season Room
The best time to start building your 3 season outdoor room is late winter through early spring, typically February through April. This window gives you the perfect balance: contractors have more availability before their busy season kicks in, weather conditions are workable in most regions, and your project wraps up just as outdoor living season begins.
Starting construction in this window also lets you address any unexpected delays without eating into the months when you’re eager to use the space. You’ll finish well before summer gatherings and fall evenings become irresistible, rather than watching the season slip away while you’re still waiting on the final touches. If you’re in a region with harsh winters, aim for March or April when ground conditions improve and material handling becomes easier.
Understanding the Construction Timeline
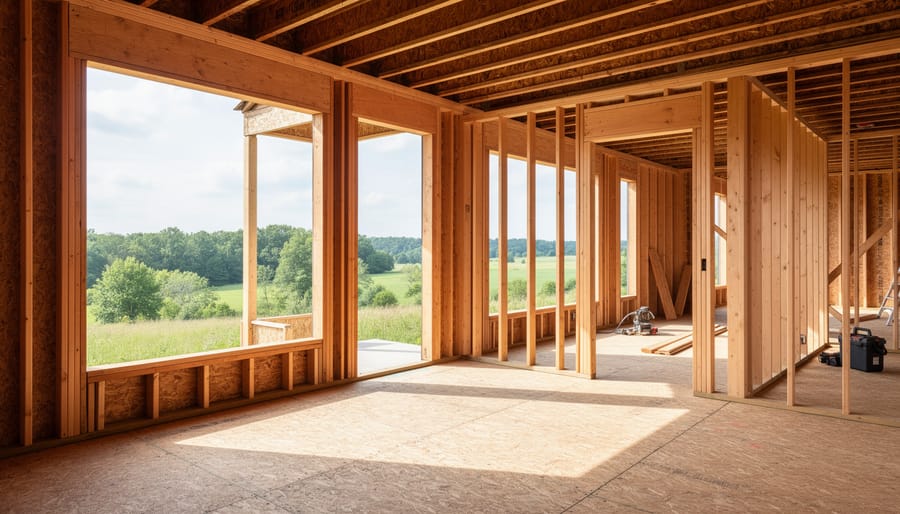
Building a 3 season room isn’t an overnight project, but it’s not an endless construction saga either. Most projects wrap up in 6 to 12 weeks from groundbreaking to your first evening with feet up and a book in hand. The timeline depends on your room’s size, complexity, and whether you’re adding electrical or plumbing, but knowing what to expect helps you work backward from your target date.
The process breaks into distinct phases, each with its own rhythm and weather needs:
| Project Phase | Typical Duration | Best Weather Conditions |
|---|---|---|
| Planning & Permits | 2-4 weeks | Any season (indoor work) |
| Foundation & Footings | 1-2 weeks | Above freezing, dry ground |
| Framing & Enclosure | 2-3 weeks | Mild temps, minimal rain |
| Finishing & Details | 1-2 weeks | Moderate weather preferred |
Weather delays can stretch these windows, especially during rainy springs or scorching summers when crews need to pause. If you dream of hosting Memorial Day weekend in your new space, you’ll want shovels in the ground by late February or early March at the latest. Planning to enjoy fall foliage from your three-season retreat means starting construction no later than mid-summer, though earlier is safer.
The permitting phase often catches people off guard. Some municipalities move quickly, others take weeks, and you can’t break ground without approval. Factor this buffer into your timeline, and you’ll save yourself the frustration of watching perfect building weather slip by while paperwork crawls through the system.

Seasonal Construction Windows: What Works Best
Late Winter to Early Spring (February, April)
Late winter to early spring hits that goldilocks zone where everything aligns in your favor. Contractors are finishing up indoor winter work but haven’t yet been swamped with the spring rush, so you’ll have better availability and potentially more negotiating room on pricing. The ground has typically thawed enough for foundation work in most regions, yet you’re not dealing with summer heat that slows crew productivity.
Most importantly, a February or March start means you’re wrapping up in April or May, right when you actually want to use the space. You’ll have your room ready for those first warm weekends instead of watching construction happen during the season you built it for.
The planning advantage matters too. You’ve had all winter to research, get permits sorted, and make design decisions without rushing. Your contractor can order materials during slower supply periods, and you can schedule inspections before the municipal offices get backed up with spring projects. This timeline also gives you breathing room if weather delays push things back a week or two, which happens.
Late Spring to Early Summer (May, June)
May and June bring consistently warm weather and dry conditions that make construction smoother and more predictable. Your contractor can work without winter’s frost delays or spring’s muddy interruptions, and materials install cleanly in stable temperatures. The ground is workable, concrete cures reliably, and longer daylight hours mean crews can accomplish more each day.
The catch? Everyone else wants to build now too. Contractor schedules fill up fast in late spring, often booked months ahead, and you’ll pay premium rates for the privilege. Material costs tend to spike with high seasonal demand. More importantly, if you start in May, you’re racing the calendar. A typical 3 season room takes six to ten weeks to complete, meaning a June start might push your finish into August. You’ll watch the best outdoor months slip by while construction dust settles, which feels particularly frustrating when neighbours are already hosting summer gatherings in their completed spaces.
If you choose this window, book your contractor by February and accept that you’re building for next year’s enjoyment, not this summer’s.
Summer to Early Fall (July, September)
Building a 3 season room during the heart of summer isn’t ideal, but life doesn’t always align with perfect timing. If you’re starting construction in July, August, or September, you’ll face some real challenges. The biggest? You’re sacrificing the very months you’d most want to use your new space. There’s genuine disappointment in watching crews frame walls while you could be relaxing in the finished room.
Heat creates its own complications. Concrete cures differently in extreme temperatures, paint and finishes require specific conditions, and workers slow down when it’s sweltering. Contractor rates often peak during these busy months, too. Weather delays from summer storms can push your project into fall.
That said, if circumstances demand it, building now isn’t impossible. Just accept you’re trading this season’s enjoyment for next year’s, and budget extra time and money for weather contingencies. You’ll likely finish by mid-fall, giving you a brief window before winter closure.
Late Fall to Winter (October, January)
Most contractors will tell you straight: this isn’t the time to break ground on a 3 season room. Cold temperatures, frozen soil, and unpredictable weather make construction difficult and often impossible in many regions. Materials behave differently in the cold, adhesives don’t cure properly, concrete won’t set, and workers can’t perform their best in harsh conditions.
That said, late fall and winter aren’t wasted months. This is actually the perfect time to handle everything that happens before construction starts. Meet with designers, finalize your plans, secure permits, and lock in your contractor for a spring start. You’ll have their undivided attention since demand is lower, and you’ll be first in line when the weather breaks. Use these months for the planning work, not the building itself.
Factors That Can Shift Your Timeline
Even with a perfect timeline in mind, life rarely follows the script. Several practical factors can push your construction start date forward or backward, and that’s completely okay. The goal is to launch your project when conditions align, not to force an arbitrary ideal.
Here are the key considerations that might shift when you begin:
- Your climate zone and local weather patterns, what works in Phoenix differs dramatically from Portland
- Contractor availability in your area, good builders book months ahead, especially in popular seasons
- Permit processing times, some municipalities approve in days, others take six weeks or longer
- Your budget and financing readiness, waiting until funds are secure beats rushing with shaky finances
- Material lead times and availability, custom windows or specialty doors can push timelines by weeks
- Whether you’re DIYing any portion, tackling some work yourself changes the pace entirely
Your personal schedule matters just as much as the weather. If you work from home and can oversee daily progress, you might feel comfortable starting during a busier season when contractors charge premium rates but deliver faster. If you travel frequently for work, a slower winter build with more forgiving oversight might actually suit you better.
Existing home conditions can also dictate timing. Discovering that your deck needs structural repairs before adding a room means tacking extra weeks onto the front end. Similarly, if your yard requires drainage work or grading, you’ll want that handled during drier months regardless of when you hoped to build.
Don’t underestimate the inspection and approval process. Some projects sail through, while others hit snags that require plan revisions and resubmission. Building departments slow down around holidays, and a single missed inspection can delay your project by a week or more.
Finally, consider your family’s rhythm. Starting construction right before a major life event, a new baby, a big trip, hosting relatives, adds stress you don’t need. Sometimes the best time to build is simply when your household can handle the disruption, even if that means waiting an extra season. Your 3 season room will deliver years of enjoyment; a few months’ delay to get the timing right for your situation is a small trade-off.

Getting Your 3 Season Room Ready for Use
Once the hammers stop and your contractor hands over the keys, the real fun begins. That empty shell transforms into your favorite spot once you add the right touches. Here’s how to get your new 3 season room ready for its first season of use.
Final Walkthrough and Punch List
Walk through with your contractor before they leave. Check that screens fit snugly, windows open smoothly, and doors seal properly. Test electrical outlets and switches. Note any touch-ups needed on paint or trim. Address these items now rather than discovering problems mid-party.
Deep Clean Before You Settle In
Construction dust settles everywhere, even with careful crews. Wipe down all window frames, sills, and screens. Vacuum corners and sweep the floor thoroughly. Clean the glass inside and out so you get the full view you built this room to enjoy. Open everything up and let fresh air circulate for a few hours to clear any lingering new-material smell.
Bringing Your Space to Life
Follow these steps to transform the bare room into a welcoming retreat:
- Install window treatments first if you want them, blinds, curtains, or shades give you privacy and sun control when needed
- Arrange furniture with traffic flow in mind, leaving clear pathways and grouping seating to encourage conversation
- Set up outdoor lighting on dimmers so you can adjust the mood from bright task lighting to soft evening ambiance
- Add weatherproof rugs to define zones and soften hard flooring
- Bring in potted plants or hanging baskets to connect the indoor-outdoor feel
- Layer in pillows, throws, and seasonal décor that you can easily swap as months change
For lighting, consider charming outdoor lights strung along the ceiling or color-changing lights that let you shift the atmosphere with the seasons.
First-Season Settling
Give yourself a week or two to live in the space before making final decisions about layout or purchases. You might discover that the afternoon sun hits differently than expected, or that you need a side table you didn’t originally plan for. Let the room tell you what it needs as you use it.
Seasonal Care and Maintenance After Construction
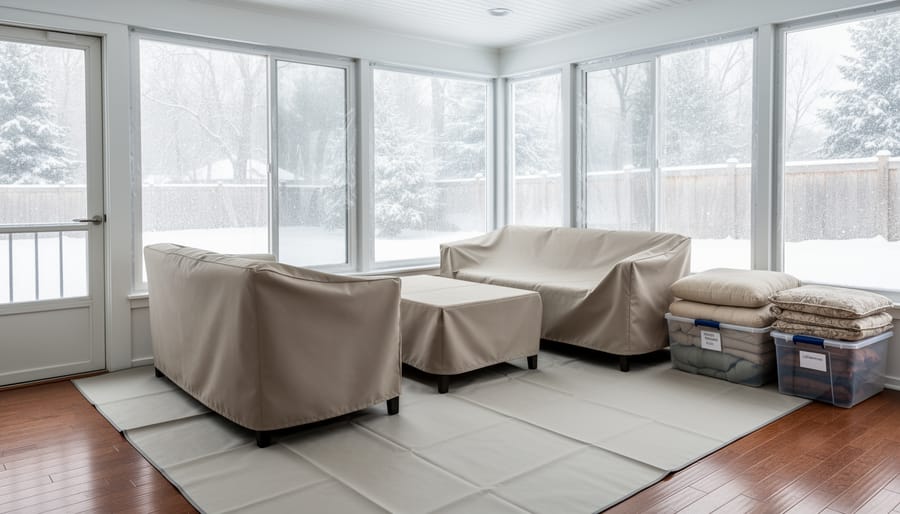
Your 3 season room will reward you with years of comfortable outdoor living if you give it a little seasonal attention. Think of it as putting your space to bed in the fall and waking it up in the spring, simple routines that prevent problems and keep everything fresh.
When autumn arrives and temperatures drop consistently, take an afternoon to prepare your room for winter. Remove cushions, fabric items, and any delicate decor that might suffer from moisture or temperature swings. Give surfaces a thorough cleaning, paying special attention to screens and windows where pollen and debris accumulate. Check weather stripping and seals around doors and windows, replacing any that look worn. If your room has ceiling fans or year-round color-changing lights consider leaving them installed but turning them off at the breaker to prevent winter moisture issues.
Come spring, reopening your room is a joy. Start by sweeping out any debris that blew in over winter, then wash windows inside and out to let in maximum light. Inspect screens for tears or holes, repairing small ones with screen patch kits. Wipe down all surfaces with a mild cleaner, check that ceiling fans spin freely, and look for any signs of moisture damage or pest activity. Replace weather stripping if needed, then bring your furniture and decor back in.
Throughout the active season, a quick weekly sweep and monthly deep clean keep your room inviting. Hose down screens occasionally, wipe ceiling fan blades, and address any small repairs immediately rather than letting them become bigger problems.
Common Questions About 3 Season Room Timing
Can I still enjoy my 3 season room when weather isn’t perfect? Absolutely, though extreme weather will limit use. Most 3 season rooms comfortably extend your outdoor season from early spring through late fall, but they’re not designed for freezing winter months or the hottest summer days without supplemental heating or cooling.
How far ahead should I start planning my project? Start at least four to six months before you want the room completed. This gives you time to research contractors, finalize designs, secure permits, and account for any unexpected delays, so you’re not scrambling or settling for less-than-ideal timing.
What happens if bad weather delays construction? Weather delays are common, especially with projects that start in late fall or early spring. Most contractors build buffer time into their schedules, but be prepared for your timeline to stretch by a few weeks. Clear communication with your contractor about realistic expectations helps manage frustration.
Is building during the off-season actually cheaper? Sometimes yes, as contractors may offer better rates when demand is lower (typically late fall through winter). However, the savings can be offset by weather-related complications, material protection needs, and potential project delays that increase labor costs.
Do I need special permits for a 3 season room? Most jurisdictions require building permits for structures that add enclosed space to your home. Requirements vary by location and whether you’re building from scratch or converting an existing porch, so check with your local building department early in the planning process.
How do I find a contractor experienced with 3 season rooms? Look for contractors who specialize in outdoor living spaces or home additions rather than general handymen. Ask for photos of completed 3 season rooms, check reviews specifically mentioning these projects, and verify they understand ventilation, seasonal drainage, and weatherproofing unique to these spaces.
Can you use a 3 season room in winter?
Not comfortably in most climates, as these rooms lack the insulation and heating systems needed for freezing temperatures. They’re designed for spring through fall use.
What if weather delays my construction project?
Build buffer time into your expectations, two to three weeks is reasonable. Stay in close contact with your contractor and be flexible about completion dates rather than locked into specific calendar deadlines.
How far in advance should I start planning?
Begin four to six months before your target completion date to allow time for design decisions, contractor scheduling, permit approval, and material ordering without rushing or compromising quality.
Once your room is complete, think about finishing touches that enhance usability across seasons. Comfortable furniture, weather-resistant textiles, and seasonal lighting ideas transform a bare structure into an inviting retreat you’ll actually use, not just admire through the window.
Key Terms
- 3 Season Room
- An enclosed outdoor living space designed for comfortable use in spring, summer, and fall, typically featuring large windows or screens but without the full insulation and climate control of a four-season addition. It extends your home’s living area while maintaining a connection to the outdoors.
- Frost Line
- The depth at which groundwater in soil freezes during winter, which varies by region and determines how deep footings must be installed. Construction becomes difficult or impossible when the ground is frozen below this line.
- Foundation Footings
- The concrete base that supports your room’s structure, typically poured below the frost line to prevent shifting or cracking from freeze-thaw cycles. Proper footings are essential for a stable, long-lasting addition.
- Seasonal Transitions
- The process of opening your room for warm-weather use in spring and closing it down for winter, which includes cleaning, checking seals, and sometimes adding or removing screens or storm panels.
- Building Permit
- Official approval from your local government required before construction begins, which can take several weeks to obtain and often needs to be secured before contractors can start work. Processing times vary by municipality and season.
These terms come up frequently when planning your project, and understanding them helps you communicate clearly with contractors and make informed decisions about timing and construction requirements.
Planning your 3 season outdoor room doesn’t have to wait for the perfect moment. Whether you’re dreaming about lazy spring mornings with coffee or crisp fall evenings wrapped in blankets, the best time to start is right now. Map out your vision, chat with contractors, and get those permits rolling, even if construction is months away.
The timing details matter, sure, but what really counts is creating a space that extends your home into the rhythm of the seasons. You’ll gain months of extra living space each year, countless memories with family and friends, and that satisfying feeling of stepping into a room you planned just right. Trust the process, plan thoughtfully, and know that those extra seasons of enjoyment will be worth every bit of effort you put into getting the timing right.